Panel Descriptions
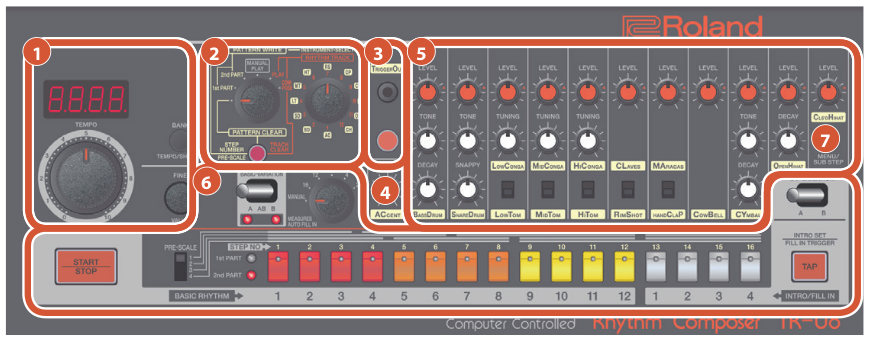
Display/Tempo section
The current tempo is shown in the display.
| CONTROLLER | EXPLANATION |
|---|---|
| [TEMPO] dial | Adjusts the tempo. |
| [BANK] (TEMPO/SHUFFLE) button | Hold down the [BANK] button and press a [1]–[16] button to select a bank. Continue holding down the [BANK] button and press a [1]–[16] button once again to select a number. If you release the [BANK] button without specifying a number, the previous pattern remains. |
| [FINE] (VALUE) knob | Finely adjusts the tempo. You can also press the [BANK] button to switch to the decimal point display. Turning this knob while holding down the [BANK] button adjusts the amount of shuffle (rhythmic bounce). |
Mode switch/Select switch/ [CLEAR] button
| CONTROLLER | EXPLANATION |
|---|---|
| Mode switch | PATTERN CLEAR This mode lets you clear a rhythm pattern. PATTERN WRITE 1st PART This mode lets you write to the 1st part. PATTERN WRITE 2nd PART This mode lets you write to the 2nd part. MANUAL PLAY This mode lets you play manually. PLAY This mode lets you play a rhythm track that you composed. COMPOSE This mode lets you compose a rhythm track. |
| Select switch | Selects an instrument. AC (ACCENT), BD (BASS DRUM), SD (SNARE DRUM), LT (LOW TOM), MT (MID TOM), HT (HI TOM), RS (RIM SHOT), CP (HAND CLAP), CB (COWBELL), CY (CYMBAL), OH (OPEN HIHAT), CH (CLS’D HIHAT) |
| [CLEAR] button | Clears the recorded content from an individual instrument, or clears a rhythm pattern. |
TRIGGER OUT section
| CONTROLLER | EXPLANATION |
|---|---|
| TRIGGER OUT jack |
a mini-plug (mono). * Do not use a stereo mini-plug cable. It will not work correctly. |
| TRIGGER OUT button | Use this to input a trigger out signal during step-write, or for tap write input. |
[ACCENT] knob
Adjusts the strength of the accent.
INST edit section
Here you can adjust the character of each instrument. You can use 11 different instruments (BD–CH) in a pattern.
| CONTROLLER | EXPLANATION |
|---|---|
| [LEVEL] knob | Adjusts the volume of the instrument. |
| [TONE] knob | In the case of the bass drum and snare drum, this adjusts the tension of the head. In the case of the cymbal, this adjusts the character of the sound. |
| [TUNING] knob | Adjusts the pitch of a tom or conga. |
| [DECAY] knob | Adjusts the decay. Turn the knob toward the left for a crisp sound, or toward the right for a more extended sound. |
| [SNAPPY] knob | Controls the sound of a snare drum’s wire snare. Turn the knob toward the left for a sound without the wire snare. |
| Instrument select switch | Selects an instrument. It is not possible to play or write both of these instruments simultaneously. LOW CONGA <=> LOW TOM, MID CONGA <=> MID TOM HI CONGA <=> HI TOM, CLAVES <=> RIM SHOT, MARACAS <=> HAND CLAP |
Sequencer section
| CONTROLLER | EXPLANATION |
|---|---|
| [BASIC-VARIATION] switch | This switch selects a variation of the basic rhythm. The A (or B) position repeats the A (or B) rhythm pattern. The AB position alternately repeats rhythm patterns A and B. |
| Measures selector | Selects the interval at which a fill-in is automatically inserted (auto fill-in). MANUAL (a fill-in is not inserted automatically) 16, 12, 8, 4, 2 (units of measures) |
| [I/F-VARIATION] switch | Selects the variation of intro and fill-in. |
| [START/STOP] button | Plays/stops the rhythm pattern. |
| [PRE-SCALE] switch | Selects the note length of a step. 1: 8th note triplet 2: 16th note triplet 3: 16th note 4: 32nd note |
| 1st PART/2nd PART indicator | Indicates which part is currently playing. |
| [1]–[12] button | STEP NO [1]–[12] / BASIC RHYTHM [1]–[12] For each step, these buttons turn on/off the instrument that is selected by the select switch. These buttons select a rhythm pattern that is written into BASIC RHYTHM. |
| [13]–[16] button | STEP NO [13]–[16] / INTRO/FILL IN [1]–[4] For each step, these buttons turn on/off the instrument that is selected by the select switch. These buttons select a rhythm pattern that is written into INTRO/FILL IN. |
| [TAP] button | When using the intro, this button turns the intro on/off. To use a fill-in, press this button at the location where you want to insert a fill-in. |
