Playing/Recording a Rhythm Pattern
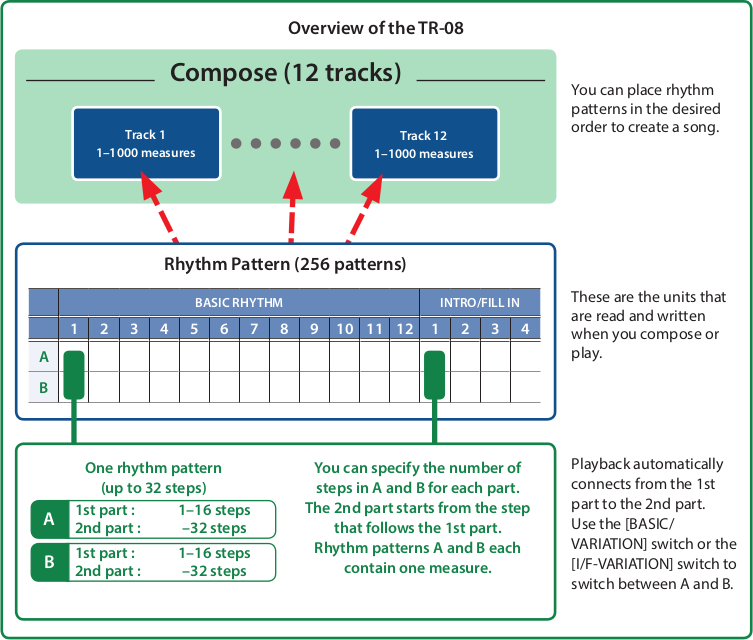
The recorded performance data is called a “rhythm pattern.”
The TR-08 has 256 rhythm patterns, and two variations (A and B) for each rhythm pattern.
Playing a Rhythm Pattern
Selecting PATTERN PLAY mode
- Set the mode switch to MANUAL PLAY.
- One of the INTRO/FILL IN [1]–[4] indicators is lit, and one of the BASIC RHYTHM [1]–[12] indicators is blinking.
Selecting a rhythm pattern
- Press a BASIC RHYTHM [1]–[12] button to select the basic rhythm.
- The indicator of the selected rhythm pattern is blinking.
- Set the [BASIC-VARIATION] switch.
- If you select AB, A (first measure) and B (second measure) play alternately.
Playing a rhythm pattern
- Press the [START/STOP] button.
- The STEP NO indicators light successively from left to right.
- Use the [LEVEL] knob of each instrument to adjust the volume balance, and use the rear panel [VOLUME] knob to adjust the overall volume.
Playing patterns consecutively
When selecting a pattern, you can select multiple patterns by pressing two buttons at the same time. The patterns you’ve selected will play consecutively. The currently-playing pattern blinks.
Adjusting the Tempo
- Use the [TEMPO] dial or the [FINE] knob to adjust the playback speed (40.00–300.00 BPM).
- To stop, press the [START/STOP] button once again.
Intro / Fill-In Operations
You can add an intro before the basic rhythm plays, or insert a fill-in while the basic rhythm plays.
Adding an intro
- Press an INTRO/FILL IN [1]–[4] button to select an intro rhythm.
- Set the [I/F-VARIATION] switch.
- Press the [TAP] button. The indicator of the selected intro blinks. To cancel the intro, press the [TAP] button once again.
- Press the [START/STOP] button. The intro plays for one measure, and then the basic rhythm plays.
Inserting a fill-In
Manually
Set the measure selector to “MANUAL.”
Press the [START/STOP] button.
Press an INTRO/FILL IN [1]–[4] button to select a fill-in rhythm.
Set the [I/F-VARIATION] switch.
Press the [TAP] button when you want to insert a fill-in.
If the first beat is playing, the fill-in is inserted starting at the second beat; if the second or subsequent beat is playing, the fill-in is inserted starting at the next measure.
Using auto fill-in
- Press a BASIC RHYTHM [1]–[12] button to select a basic rhythm.
- Set the [BASIC-VARIATION] switch to the desired position.
- Use the measure selector to specify the interval at which a fill-in is inserted. 2 (every two measures), 4 (every four measures), 8 (every eight measures), 12 (every 12 measures), 16 (every 16 measures)
- Press an INTRO/FILL IN [1]–[4] button to select a fill-in rhythm.
- Press the [START/STOP] button.
A fill-in is automatically inserted at the specified interval of measures.
To cancel auto fill-in, set the measure selector to MANUAL.
- You can rhythm-pattern-write an intro/fill-in during playback by holding down the [TAP] button and pressing the [1]–[16] buttons.
- Even while auto fill-in is specified, you can use the [TAP] button to insert a fill-in.
Recording a Rhythm Pattern
On the TR-08, the process of recording or editing a one-measure pattern is called “rhythm pattern write.” You can write a rhythm pattern using either of the following two methods.
Step Write (Step Recording)
Create a pattern by specifying the steps at which each instrument will sound.
Selecting a position and clearing it
“Position” refers to A or B of each rhythm pattern.
- Set the mode switch to “PATTERN CLEAR.”
2. Press a BASIC RHYTHM [1]–[12] button (or a INTRO/FILL IN [1]–[4] button) to select a basic rhythm (intro/ fill-in).
- Set the [BASIC-VARIATION] switch (or the [I/F-VARIATION] switch) to A or B.
- Press the [CLEAR] button.
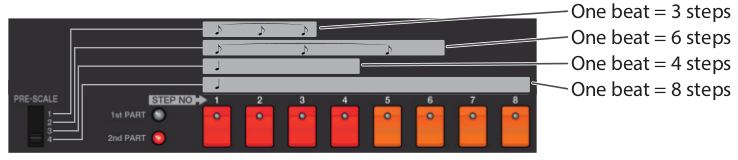
Specifying the number of steps and selecting the pre-scale
Here’s how to specify the number of steps for a part, and select the number of steps in a beat (PRE-SCALE). The Clear operation automatically sets this to 16 steps. On the TR-08, one measure is divided into subdivisions that are assigned to the STEP NO [1]–[16] buttons, allowing you to write them. These divisions are called steps. If one measure is divided into 16, one measure equals 16 steps.
- Set the mode switch to “PATTERN WRITE 1st PART.”
- Press the [START/STOP] button.
- Set the [PRE-SCALE] switch to the desired position. For each setting, the indication (scale) on the panel shows the number of steps in one beat. Press the [CLEAR] button to apply the PRE-SCALE value.
- Hold down the [CLEAR] button and press a STEP NO [1]–[16] button to specify the number of steps. When you specify this, the same number of steps is automatically specified for A and B of the same basic rhythm (or intro/fill-in), regardless of the position of the variation switch at this time. If a 16-step rhythm pattern is written to A, and you then attempt to write a 12-step rhythm pattern to B, be aware that specifying this number of steps for B will also set A to 12 steps. In this case, you can return to the previous state by once again specifying 16 steps.
Entering backbeats
By holding down the [MENU/SUB STEP] button and pressing a STEP NO [1]–[16], you can enter a note that is skewed 1/2 step later.
Writing instruments separately
Use the STEP NO [1]–[16] buttons to specify the steps at which you want an instrument to sound.
- The positions of each instrument’s knobs and switch are not memorized.
- Use the select switch to select an instrument.
- Use the STEP NO [1]–[16] buttons to specify the steps at which you want the selected instrument to sound.
- To write the steps for another instrument or for the accent, repeat steps 9–10 to write the rhythm pattern.
- When you’ve finished writing the rhythm pattern, press the [START/STOP] button.
Watching the [1]–[16] buttons
The [1]–[16] buttons are arranged in the order in which playback time flows (from left to right). If a button is pressed, a note is sounded at that step. When you’re writing a pattern, these buttons operate as step number buttons, not as rhythm select buttons.
Writing a rhythm pattern that doesn’t fit the scale
Even if the desired rhythm pattern does not fit in a single pre-scale, you can write it as follows.

When writing the pattern shown in this illustration, the first measure and the third measure can be written using pre-scale 3; however, since the second measure contains a triplet, it cannot be written using pre-scale 3 (16 steps). In this case, divide the second measure and consider it as two measures, of which the first measure can be written using pre-scale 1 (one measure = 6 steps) and the second measure can be written using pre-scale 3 (one measure = 8 steps). After writing, playing these two measures in succession results in the performance shown in the notation above.
Recording with the 1st part and 2nd part
- Start by clearing the position. => “Selecting a position and clearing it”
- Set the mode switch to “PATTERN WRITE 1st PART.”
- Press the [START/STOP] button.
- Set the [PRE-SCALE] switch to the desired position, and press the [CLEAR] button.
- Set the mode switch to “PATTERN WRITE 2nd PART.”
- Hold down the [CLEAR] button and press a STEP NO [1]–[16] button to specify the number of steps (the steps that follow from the 1st part). At this time, the flow of the steps indicated by the LEDs changes, flowing from step 1 of the 1st part to the specified number of steps of the 2nd part.
- Set the mode switch to “PATTERN WRITE 1st PART.”
- Use the select switch to select an instrument.
- Use the STEP NO [1]–[16] buttons to specify the steps at which you want a note to play.
- Set the mode switch to “PATTERN WRITE 2nd PART.”
- Use the STEP NO [1]–[16] buttons to specify the subsequent steps.
- To write the steps for another instrument or for the accent, repeat steps 7–11. The steps flow repeatedly between the 1st part 2nd part. If the mode switch is set to 1st part, only the 1st part can be written. In the same way if the mode switch is set to 2nd part, only the 2nd part can be written.
- When you’ve finished writing each instrument, press the [START/STOP] button.
Using the 2nd part
The Clear operation clears both the 1st part and the 2nd part (at this time, the 1st part is set to 16 steps and the 2nd part is set to 0 steps). In order to use the 2nd part, you must specify the number of steps. The number of steps can be freely distributed to the 1st part and the 2nd part.
- The 1st part and 2nd part together make up one pattern. You can’t use just the 2nd part by itself.
- For the 2nd part as well, variations A and B within the same basic rhythm (or intro/fill-in) have the same number of steps.
- By holding down the [CLEAR] button and pressing the [TAP] button, you can set the number of steps for the 2nd part to 0.
Random pattern generation function
- While writing/playing a pattern, hold down the [MENU] button and press the [TAP] button. The generated pattern is not written automatically. Hold down the [MENU] button and long-press the [TAP] button to write the pattern. In pattern play mode, an intro/fill-in is generated.
Tap Write (Realtime Recording)
You can create a pattern by using the [TAP] button to record each instrument in real time.
- Start by clearing the position. => “Selecting a position and clearing it”
- Set the mode switch to “PATTERN WRITE 1st PART.”
- Press the [START/STOP] button.
- Set the [PRE-SCALE] switch to the desired position, and press the [CLEAR] button.
- Use the select switch to choose the instrument that you want to use as a metronome (for example, RS: Rim Shot).
- Press the STEP NO [1]–[16] button that will start the beat (Sounding the Metronome step).
- Use the select switch to specify an instrument that you want to write by tapping.
- Press the [TAP] button at the desired timing. The LEDs light to indicate the step numbers that are closest to the timing of each tap.
- To write the steps for other instruments or for the accent, repeat steps 7–8.
- When you’ve finished writing, once again select the instrument that you selected in step 5, and clear the notes that you had been using as the metronome.
- Press the [START/STOP] button.
Memory
Within the same basic rhythm (or intro/fill-in), A and B have the same number of steps and the same pre- scale.
